
How To Install Yoast SEO In Blogger (BlogSpot) Blog
Yoast is a very popular SEO plugin that is officially only available for the WordPress platform in the form of a plugin. But today I will share a quick and easy way to install and implement all the important SEO features of Yoast in your Blogger blog.
In this tutorial, I will show examples of the free version of the Yoast SEO plugin but if you want, you can use the paid version of Yoast SEO or any other Yoast SEO alternative like Rank Math or All In One SEO Pack for your Blogger site, too.
Thus basically, after reading the complete article, you will get the complete idea of using an SEO plugin for Blogger. Now let’s dig in on How to use Yoast SEO plugin in Blogger!
Which Features Of Yoast SEO Can Be Installed Or Implemented In Blogger?
Well, first of all, it’s important to understand that there is no official version of the Yoast SEO plugin available for Blogger sites.
Thus, we can only implement certain features of the plugin, but not all.
However, luckily, we can install and use all the core and important functionalities and features of Yoast SEO in Blogger, which are crucial for ranking #1 on Google.
Benefits Of Installing Yoast SEO Plugin Features In Blogger
The features which you will be able to get by installing the Yoast SEO plugin in your Blogger Blog using the method described in this article, are:-
Highly optimize your articles with targetted keywords.
Tell Google exactly what your website is about. You can let Google know whether you’re an individual or an organization, what is your niche, your social media profiles, etc., to enhance your online branding.
Enhance the readability of your articles to increase the on-page dwell time of your site and reduce the bounce rate.
Preview how your page would appear in the Google search engine results page (SERP).
Boost your On-Page SEO with advanced real-time guidance and advice on usage of keywords, interlinking and external linking.
Maintain good consistency of your focus keywords in your articles to help rank better on Google.
The plugin will rate your article saying whether it is Good or Bad so that you can always fix your mistakes before publishing the article.
Stay updated with the latest ranking factors of Google and optimize your On-Page SEO with smart suggestions of the Yoast SEO plugin which are always up to date!
Make Google crawl your website daily for faster indexing. Also, learn how to get your articles indexed on Google Instantly, under 2 minutes.
How To Get Yoast SEO Plugin Features In Blogger
At first, I will teach you to optimize the overall SEO of your BlogSpot blog for better SERP ranking and online brand recognition.
Then, I will show you how to optimize the On-Page SEO and the readability of your articles using the Yoast SEO plugin (or any of its alternatives) to give a huge boost to your Google rankings.
Overall SEO and Schema
If you plan to create an authority site, branding is very important for your website because not only it enhances the appearance of your website in the SERP, but also creates a long-lasting impression in the user’s mind. Thus, the user always s returns to the website when he/she has queries related to the website’s niche, becoming a loyal reader!
A well-branded website always has social media profiles, a professional logo and a good quality overall website structure (navigation menu).
Progressive Web Apps are also in trend nowadays. Those are light easy to create apps of websites. You can also learn how to make a progressive web app (PWA) for your blogger blog.
To attach all this information and guide Google to properly brand your website in it’s SERP, you need to change a setting and add some code to the header of the HTML of your Blogger site.
Enable Custom Meta Description
Go to Settings – > Meta Tags and turn on Enable Search Description. Write a short description of your blog and click on Save changes.
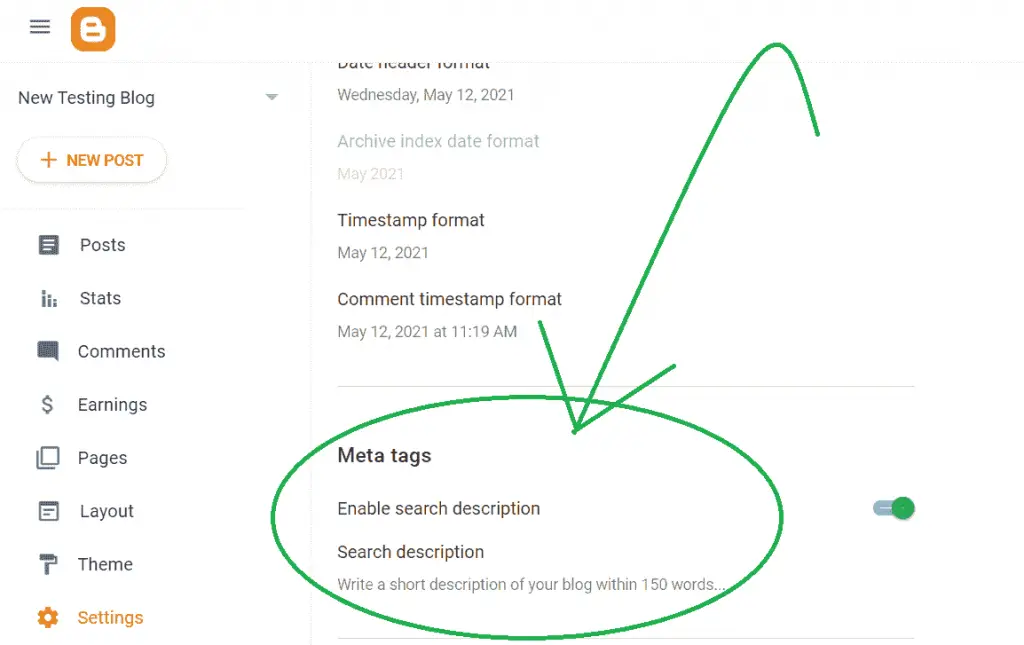
You will see that a new field called “Search Description” has been added to the post settings of every post on your blog. This option is very important for SEO and I will discuss this later in detail later in this article, so keep reading.
Add Some More Meta Tags To The Head Of Your HTML
Now, add the following code to the header of your blog. This code will add some crucial meta tags to your pages that will enhance your site’s listing on the SERP.
NOTE: PLEASE ENSURE THAT THESE SCHEMA CODES HAVE PREVIOUSLY NOT BEEN CONFIGURED ON YOUR SITE. OTHERWISE, SKIP THIS STEP.
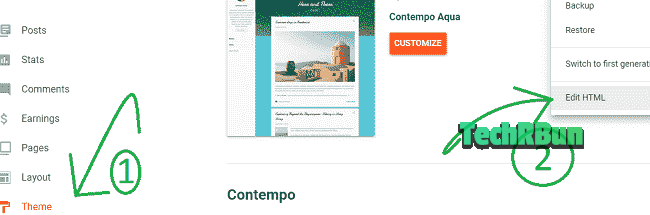
Go to Theme --> Edit HTML.
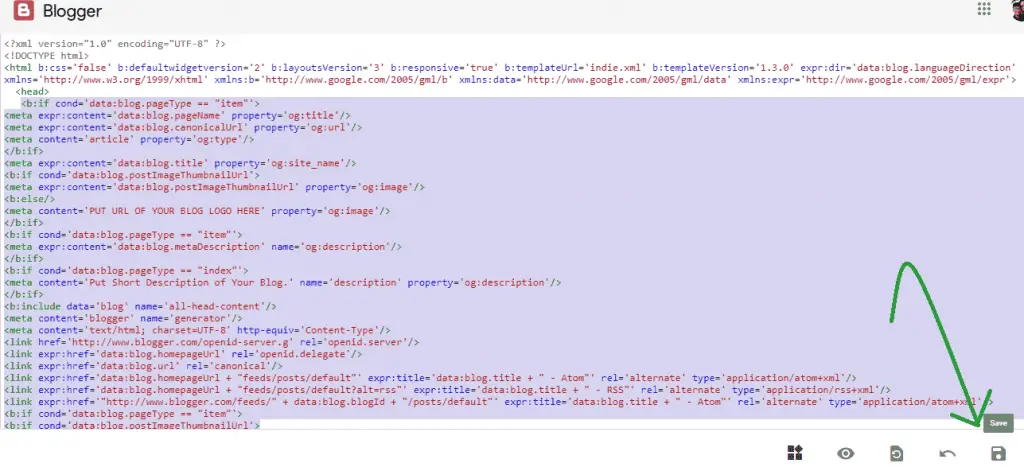
Paste the following code just after the <head> tag.
COPYING AND PASTING THIS CODE DIRECTLY WITHOUT MAKING THE CHANGES THAT ARE MENTIONED BELOW, WILL NOT WORK AND WILL BREAK YOUR SITE. SO MAKE SURE THAT YOU MAKE THE FOLLOWING CHANGES TO THIS CODE AS MENTIONED BELOW BEFORE PUTTING IT TO THE HEAD OF YOUR WEBSITE.
UPDATE: THE CODE HAS BEEN UPDATED. THE SINGLE QUOTES IN CERTAIN PLACES HAVE BEEN REPLACED WITH DOUBLE QUOTES TO PREVENT THE ERROR MESSAGES THAT THE BLOGGER HTML EDITOR WAS PRODUCING WITH THE UNMODIFIED VERSION.
BUT, YOU STILL NEED TO MAKE THE CHANGES MENTIONED BELOW THE CODE SNIPPET TO GET THE PROPER RESULTS.
Copy
<b:if cond='data:blog.pageType == "item"'>
<meta expr:content='data:blog.pageName' property='og:title'/>
<meta expr:content='data:blog.canonicalUrl' property='og:url'/>
<meta content='article' property='og:type'/>
</b:if>
<meta expr:content='data:blog.title' property='og:site_name'/>
<b:if cond='data:blog.postImageThumbnailUrl'>
<meta expr:content='data:blog.postImageThumbnailUrl' property='og:image'/>
<b:else/>
<meta content="LINE 10: URL OF THE LOGO OF YOUR BLOG" property='og:image'/>
</b:if>
<b:if cond='data:blog.pageType == "item"'>
<meta expr:content='data:blog.metaDescription' name='og:description'/>
</b:if>
<b:if cond='data:blog.pageType == "index"'>
<meta content="LINE 16: SHORT DESCRIPTION OF YOUR BLOG." name='description' property='og:description'/>
</b:if>
<b:include data='blog' name='all-head-content'/>
<meta content='blogger' name='generator'/>
<meta content='text/html; charset=UTF-8' http-equiv='Content-Type'/>
<link href='http://www.blogger.com/openid-server.g' rel='openid.server'/>
<link expr:href='data:blog.homepageUrl' rel='openid.delegate'/>
<link expr:href='data:blog.url' rel='canonical'/>
<link expr:href='data:blog.homepageUrl + "feeds/posts/default"' expr:title='data:blog.title + " - Atom"' rel='alternate' type='application/atom+xml'/>
<link expr:href='data:blog.homepageUrl + "feeds/posts/default?alt=rss"' expr:title='data:blog.title + " - RSS"' rel='alternate' type='application/rss+xml'/>
<link expr:href='"http://www.blogger.com/feeds/" + data:blog.blogId + "/posts/default"' expr:title='data:blog.title + " - Atom"' rel='alternate' type='application/atom+xml'/>
<b:if cond='data:blog.pageType == "item"'>
<b:if cond='data:blog.postImageThumbnailUrl'>
<link expr:href='data:blog.postImageThumbnailUrl' rel='image_src'/>
</b:if>
</b:if>
<meta content="LINE 36: YOUR NAME" name='Author'/>
<meta content='general' name='rating'/>
<meta content="LINE 38: WEBSITE'S OFFICIAL E-MAIL ID" name='email'/>
<meta content="LINE 39: YOUR SITE'S OFFICIAL TWITTER URL" name='twitter:site'/>
<meta content="LINE 40: YOUR SITE'S TWITTER USERNAME" name='twitter:creator'/>
<meta content='en_US' property='og:locale'/>
<b:if cond='data:blog.pageType == "index"'>
<title>LINE 43: TITLE OF YOUR BLOG</title>
<b:else/>
<b:if cond='data:blog.pageType != "error_page"'>
<title><data:blog.pageName/></title>
</b:if></b:if>
<b:if cond='data:blog.pageType == "error_page"'>
<title>Page Not Found - <data:blog.title/></title>
</b:if>
<meta content='global' name='distribution'/>
<meta content='1 days' name='revisit'/>
<meta content='1 days' name='revisit-after'/>
<meta content='document' name='resource-type'/>
<meta content='all' name='audience'/>
<meta content='general' name='rating'/>
<meta content='all' name='robots'/>
<meta content='index, follow' name='robots'/>
<b:if cond='data:blog.pageType == "archive"'>
<meta content='noindex' name='robots'/>
</b:if>
<b:if cond='data:blog.searchLabel'>
<meta content='noindex,nofollow' name='robots'/>
</b:if>
<b:if cond='data:blog.isMobile'>
<meta content='noindex,nofollow' name='robots'/>
</b:if>
At Line 10, replace “LINE 10: URL OF THE LOGO OF YOUR BLOG” with the original URL of the logo of your blog. You can upload your blog’s logo in a draft post and then right-click on the image to copy its URL.
At Line 16, replace “LINE 16: SHORT DESCRIPTION OF YOUR BLOG.” with a short description of your Blog.
At Line 36, replace “LINE 36: YOUR NAME” with the Name of the primary author who posts articles on your blog.
At Line 38, replace “LINE 38: WEBSITE’S OFFICIAL E-MAIL ID” with the real e-mail id of your blog.
At Line 39, replace “LINE 39: YOUR SITE’S OFFICIAL TWITTER URL” with the real URL to the official Twitter profile of your site.
At Line 40, replace “LINE 40: YOUR SITE’S TWITTER USERNAME” with the username of the official Twitter profile of your blog (without the @ sign).
At Line 43, replace “LINE 43: TITLE OF YOUR BLOG” with the title of your blog.
Note: The code won’t compile unless you make the above changes!
Paste it to your Blogger blog’s HTML as shown below:
On-Page SEO And Readability
Done with the settings and coding part, now it’s time to learn how to use the advance On-Page SEO boosting tools on Blogger, that Yoast SEO provides.
For this, you need to create an offline WordPress (free) site which will be hosted on our computer’s local host.
Setup WordPress On Your Local Host (Free)
Download and install the Bitnami WordPress Stack Installer [available for Windows, macOS and Linux) on your computer using the tutorial given below.
If you’re a Linux user, kindly look up the tutorial for your specific distro.
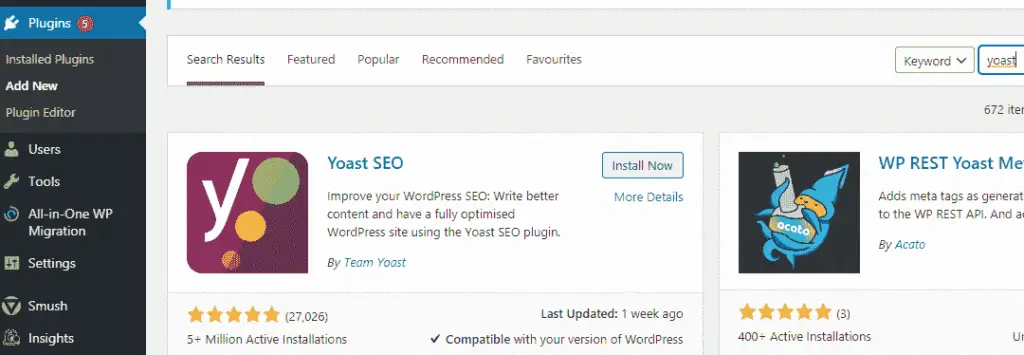
Now login to the Dashboard of your demo WordPress site and go to Plugins – > Add New. Search for “Yoast“. Click on Install Now. Then Activate It.
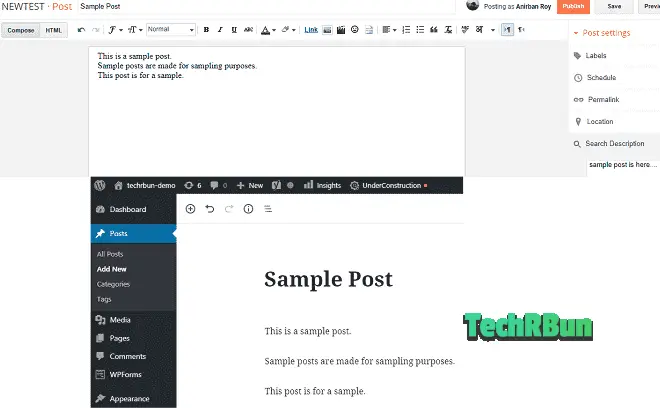
Now, all you need to do is, before publishing any post, copy and paste the whole article into a new post of the dummy WordPress and optimize your article according to the suggestions provided by the Yoast SEO plugin.
So first of all, let’s copy an article from Blogger to the demo WordPress site.
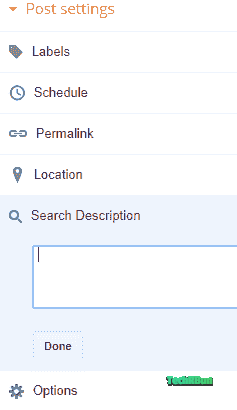
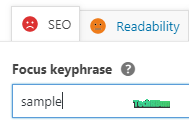
Also, scroll down and copy the “Search Description” from Blogger to the “Meta description” field of Yoast.
Now, let’s suppose that this article was meant to target the keyword “sample“. Thus, put the target keyword in the focus keyword field of Yoast.
Now, as you can see, there are unhappy faces besides SEO and Readability.
Our target is to optimize our article in such a way that both the faces turn happy green.
Now scroll down and click on the SEO Analysis drop-down menu.
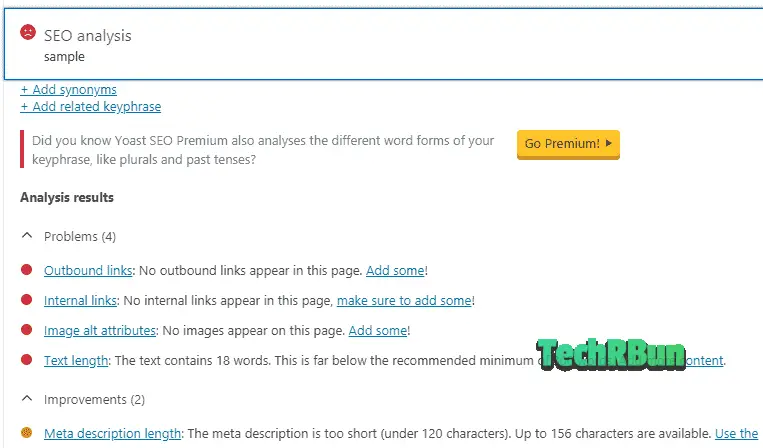
Here you will see all the mistakes that are there in your article. You need to fix those mistakes one by one in your article so that its On-Page SEO gets brushed up.
After fixing all the SEO related problems that Yoast SEO points out in your article, the red unhappy face beside the SEO Analysis button must turn into a happy green one.
Then click on Readability.
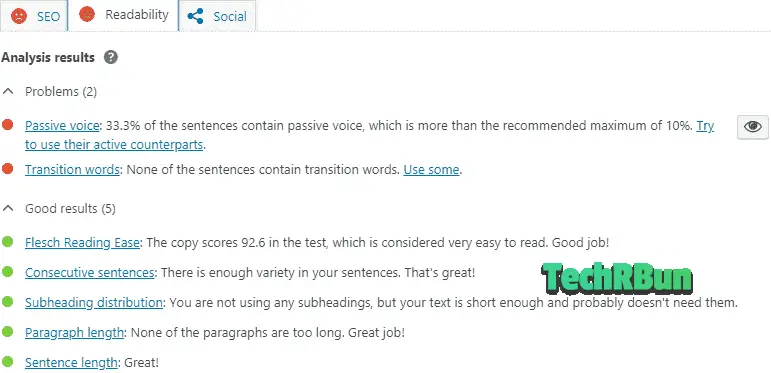
Now fix all the readability issues that Yoast SEO suggests in your article. You can click on the eye button to locate the exact line where the problem is on. Make the face beside the Readability button turn green as well!
After fixing all the SEO and readability issues in your article, just copy the article from WordPress again and paste it to Blogger and then publish it!
I would suggest you optimize all your old articles and as well all the new articles that you will publish in the future, using this method.
Note that there might be temporary loss of rankings when you update your articles but they will soon be back to the top again.
Congratulations!
You’ve successfully SEO optimized your Blogger blog and will see the huge growth in your rankings and organic traffic, soon! Keep creating quality content!
If this article has helped you use the Yoast SEO plugin in your Blogger blog, kindly consider sharing it on your favorite social media!
If you have any doubts regarding this article, feel free to comment down below.
Have a great day